
Discover essential crown procedure steps, from consultation to recovery. Know what to expect for a smooth dental experience. Read more!
Crown Procedure Steps: What Patients Should Expect

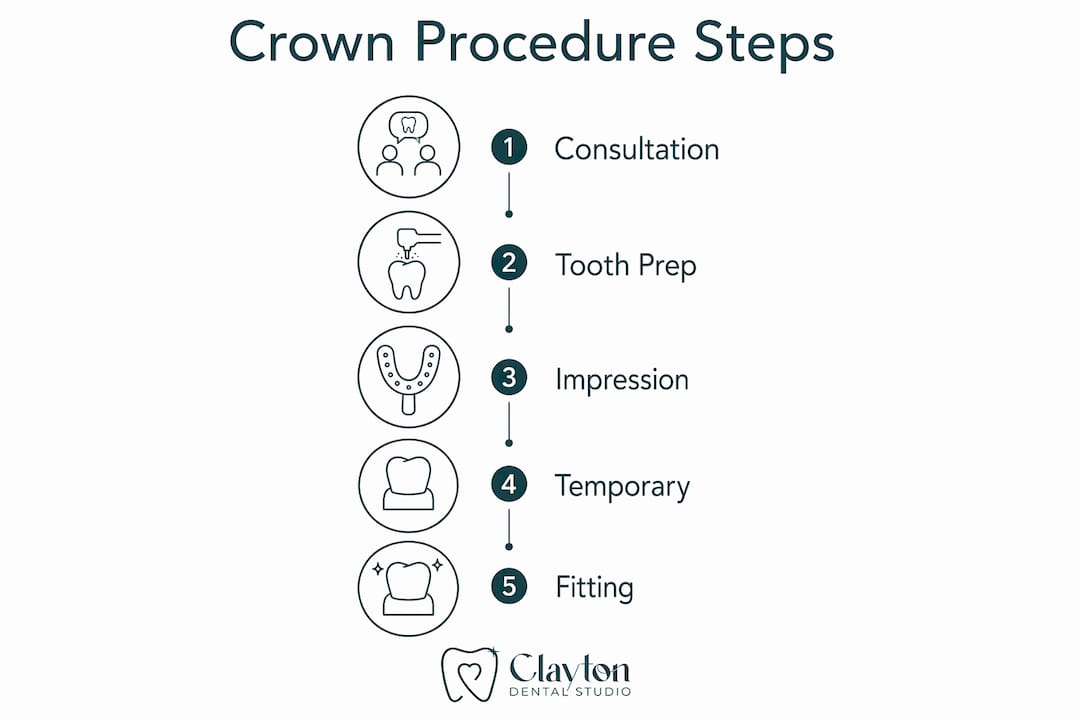
A dental crown procedure typically takes two visits spaced 1–3 weeks apart, or just one visit if your dentist uses same-day CAD/CAM technology. Here is the full sequence at a glance:
- Step 1: Consultation, x-rays, and treatment planning
- Step 2: Tooth preparation (shaping, anesthesia, decay removal)
- Step 3: Impression or digital scan
- Step 4: Temporary crown placement (traditional route) OR same-day milling (CAD/CAM route)
- Step 5: Lab fabrication (1–3 weeks) OR in-office milling (1–2 hours)
- Step 6: Final fitting, bite adjustment, and permanent cementation
- Step 7: Recovery, aftercare, and follow-up
Each appointment in the traditional workflow runs 30–90 minutes. The final fitting visit is usually 30–60 minutes. If you are anxious about any of this, that is completely understandable — and every step below is designed to help you feel prepared, not nervous.
Table of Contents
- What are the crown procedure steps, visit by visit?
- How much tooth does preparation actually remove?
- Traditional lab vs. same-day CAD/CAM: which path will you take?
- How to care for your temporary crown between visits
- What happens at your final fitting appointment?
- Recovery, aftercare, and how long your crown should last
- Warning signs and when to call your dentist
- Questions to ask your dentist before and during your crown appointment
- Key Takeaways
- What I’ve learned from placing crowns: a note from Clayton Dental Studio
- Ready to move forward? Clayton Dental Studio is here to help
- Useful sources
What are the crown procedure steps, visit by visit?
The dental crown installation process follows a clear, predictable sequence. Knowing what happens at each stage makes the whole experience far less stressful.
-
Consultation and oral exam. Your dentist takes x-rays to assess the tooth’s root health, surrounding bone, and the extent of damage. If the pulp is infected or the nerve is compromised, a root canal may be recommended before crown placement. If a large portion of the tooth is missing, a core buildup (adding composite material to create a stable base) may be needed first.
-
Anesthesia and tooth preparation. Local anesthesia numbs the area completely. Your dentist then removes decay, shapes the tooth on all sides, and creates a defined margin (the edge where the crown meets the natural tooth). This step usually takes between 45 minutes and an hour.
-
Impression or digital scan. Traditional putty impressions capture the shape of the prepared tooth and surrounding teeth. Digital intraoral scanners do the same thing without the tray — more comfortable and faster. This data goes to the lab or, in same-day cases, directly to the milling machine.
-
Temporary crown placement (traditional route). A prefabricated acrylic or composite temporary crown is cemented over the prepared tooth to protect it while the permanent crown is made. You wear this for 1–3 weeks.
-
Crown fabrication. The dental lab crafts your permanent crown from the impression. Lab turnaround is typically 1–3 weeks. With CAD/CAM technology, the crown is designed digitally and milled in-office in about 1–2 hours.
-
Final fitting and cementation. The temporary crown comes off, the permanent crown is tried in, and your dentist checks the fit, color, and bite. Adjustments are made before the crown is permanently cemented.
-
Post-op check. You leave with care instructions and a follow-up plan. Mild sensitivity is normal for a few days.
Pro Tip: If you have dental anxiety, ask about comfort options before your first appointment. Knowing what to expect — and having support in place — makes a real difference in how you experience each visit.
How much tooth does preparation actually remove?
Tooth preparation is the step patients most often worry about, and understanding it tends to ease that worry considerably.
Your dentist removes about 1–2 millimeters of tooth structure from the outer surface to create room for the crown. The exact amount depends on the crown material: full metal crowns require the least reduction, while all-porcelain and zirconia crowns may need slightly more space to achieve the right strength and appearance.
The margin, or finish line, is the boundary where the crown edge meets the tooth. Two common designs are the chamfer (a gentle curved groove) and the shoulder (a flat, right-angle ledge). Proper finish line geometry is critical for a tight seal that resists decay and fracture over time. A poorly designed margin is one of the most common reasons crowns fail early.
When is a core buildup or post needed?
- Core buildup: Required when decay or a previous large filling has left too little natural tooth to support a crown. Composite resin is bonded to the remaining structure to create a stable foundation.
- Post and core: Used after a root canal when the tooth’s internal structure is insufficient. A post is placed into the root canal space, then a core is built around it before crown preparation begins.
Neither of these additions is a complication. They are standard steps that give your crown the best possible base.
Traditional lab vs. same-day CAD/CAM: which path will you take?
How your crown is made affects how many visits you need, how long you wait, and what the final result looks and feels like.
| Feature | Traditional lab workflow | Same-day CAD/CAM (CEREC) |
|---|---|---|
| Impression type | Putty tray impression | Digital intraoral scan |
| Fabrication location | Off-site dental lab | In-office milling unit |
| Turnaround time | 1–3 weeks | 1–2 hours |
| Visits required | 2 (plus any pre-treatment) | 1 |
| Temporary crown needed | Yes | No |
| Material options | Porcelain, zirconia, PFM, metal | Primarily zirconia or ceramic |
Digital scans are more comfortable than putty impressions and eliminate the risk of a distorted mold. They also allow the dentist to review the preparation on-screen immediately, catching any issues before the crown is made.
Crown material options and what they mean for you:
- Full porcelain / all-ceramic: Best esthetics, ideal for front teeth, slightly more tooth reduction needed.
- Zirconia: Extremely strong, tooth-colored, works well for back teeth with heavy bite forces.
- Porcelain-fused-to-metal (PFM): Good esthetics with metal strength, but a gray line can appear at the gum over time.
- Full metal (gold or alloy): Least tooth reduction, most durable, typically reserved for back molars where appearance is less of a concern.
Material choice is a conversation worth having with your dentist. The location of the tooth, your bite forces, and your esthetic goals all factor in. Bite and aesthetic considerations often point toward different materials for front versus back teeth.
How to care for your temporary crown between visits
A temporary crown is not meant to be permanent, and it is not built like one. It is made from acrylic or composite resin and held in place with weaker cement by design so your dentist can remove it easily at the next appointment.
Foods and habits to avoid:
- Sticky foods: gum, caramel, taffy, dried fruit
- Chewy foods: bagels, tough bread, chewy candy
- Hard foods: ice, hard nuts, raw carrots
- Chewing on the side with the temporary crown whenever possible
Brushing and flossing tips:
- Brush gently around the temporary, as you normally would
- Floss carefully by sliding the floss out sideways rather than snapping it up through the contact — that motion can pull the temporary off
If the temporary loosens or falls off: Call your dentist the same day. Do not leave the prepared tooth unprotected for long. The tooth underneath is sensitive and can shift slightly without the temporary in place, which may affect how well the permanent crown fits.
Pro Tip: Keep a small amount of dental adhesive (available at most pharmacies) on hand. If your temporary comes off and you cannot reach your dentist immediately, a thin layer of adhesive can hold it in place temporarily — but this is a short-term fix, not a substitute for calling the office.
What happens at your final fitting appointment?
The second visit is where everything comes together. It is also the appointment that most directly determines how comfortable and functional your crown will be for years to come.
Your dentist removes the temporary crown and cleans the prepared tooth. The permanent crown is placed without cement first so the dentist can check:
- Margins: The crown edge should sit flush with the tooth, with no gaps or overhangs.
- Contacts: The crown should touch adjacent teeth with the right amount of pressure — not too tight, not too loose.
- Color and shape: Especially important for visible teeth; the crown should blend naturally.
- Bite alignment: You will be asked to bite down on articulating paper (a thin, colored sheet) that marks where the crown contacts the opposing teeth. Fine-tuning bite alignment protects both the new crown and the teeth it bites against.
Once everything checks out, the tooth is cleaned and dried, bonding agent or cement is applied, and the crown is seated. Excess cement is removed carefully from around the margins. A final bite check confirms everything feels right. The whole appointment typically takes 30–60 minutes.
Pro Tip: Tell your dentist immediately if the bite feels even slightly off after cementation. A high bite that is not adjusted can cause jaw soreness, headaches, and stress on the crown itself. It is a quick fix in the chair — and much easier to address right away.
Recovery, aftercare, and how long your crown should last
Most patients feel comfortable within a day or two. Short-term sensitivity to cold, heat, or biting pressure is common after permanent cementation and usually resolves on its own within a few days. If sensitivity worsens or persists beyond two weeks, contact your dentist.
Daily care checklist for crown longevity:
- Brush twice daily with a soft-bristled toothbrush and fluoride toothpaste
- Floss daily, including around the crown margin where plaque accumulates
- Use a non-abrasive toothpaste to protect the crown surface
- Avoid chewing ice, hard candies, or using your teeth as tools
- Wear a night guard if you grind your teeth (bruxism accelerates crown wear significantly)
- Schedule professional hygiene visits every six months
Crowns commonly last 5–15 years, and many last longer with consistent care. The honest truth is that the 5–15 year range is a starting point, not a ceiling. Daily hygiene habits and occlusal forces (how hard and where you bite) matter more than the material alone. A zirconia crown on a patient who grinds heavily without a night guard may fail sooner than a porcelain-fused-to-metal crown on a patient with excellent hygiene and a calm bite.
Warning signs and when to call your dentist
Most crown complications are manageable when caught early. Here is what to watch for and how urgently to act.
Call your dentist the same day if you notice:
- The crown has come off or feels loose
- Severe or uncontrolled pain that does not respond to over-the-counter pain relief
- Visible swelling in the gum, jaw, or face
- Fever or a bad taste that suggests infection
- Drainage or pus near the crown
Schedule a prompt (non-emergency) appointment for:
- Sensitivity that is getting worse rather than better after the first week
- A bite that feels consistently off, even after the initial adjustment period
- A visible crack or chip in the crown
- Gum recession exposing the crown margin, which can increase decay risk
At home, if the crown falls off, rinse it gently, keep it safe, and call the office. Do not try to re-cement it yourself with household adhesives. If there is pain, over-the-counter ibuprofen can help manage discomfort until you are seen. For urgent situations, emergency dental care is available to address crown complications quickly.
Questions to ask your dentist before and during your crown appointment
Being prepared for your consultation makes the whole process smoother. Here are the questions worth raising, and the clinical context behind each one.
Before treatment:
- Do I need a root canal or core buildup before the crown? (Ask this early — it affects your timeline and cost.)
- Which material do you recommend for this tooth, and why?
- Is a same-day crown an option for my case?
- What does the warranty or follow-up care look like if something goes wrong?
About cost and tradeoffs:
- Front teeth generally favor all-ceramic or zirconia for esthetics; back teeth can tolerate metal or zirconia for strength. Ask your dentist to explain the tradeoff for your specific tooth location and bite pattern.
- A crown that costs more upfront but lasts longer may be the better value. Ask about material options relative to your insurance coverage and out-of-pocket costs.
Practical preparation tips:
- Eat a light meal before your preparation appointment, since you will be numb for a few hours afterward.
- Arrange a ride if you are having sedation or feel anxious about driving post-procedure.
- Bring your insurance card, a list of current medications, and any questions written down.
Pro Tip: Do not hesitate to ask your dentist to walk you through each step as it happens. Most patients find that narration during the procedure reduces anxiety significantly. A good dental team welcomes that request.
Key Takeaways
A dental crown procedure follows a predictable sequence of steps, and knowing what to expect at each stage is the most effective way to feel calm and prepared going in.
| Point | Details |
|---|---|
| Two common workflows | Traditional two-visit lab route (1–3 weeks between visits) or single-visit CAD/CAM milling (1–2 hours). |
| Tooth preparation is minimal | About 1–2 mm of enamel is removed; the exact amount depends on the crown material chosen. |
| Temporary crown care matters | Avoid sticky and chewy foods; floss by sliding sideways to prevent dislodging the temporary. |
| Longevity depends on daily habits | Crowns commonly last 5–15 years; bruxism and poor hygiene are the top factors that shorten that range. |
| Clayton Dental Studio | Offers same-day CEREC crowns in Humble, TX, so eligible patients can complete the entire process in one visit. |
What I’ve learned from placing crowns: a note from Clayton Dental Studio
The patients who feel most at ease during a crown procedure are almost always the ones who understood what was coming. Not because the procedure changed, but because their experience of it did. Anxiety shrinks when you know that the “drilling” is just careful shaping, that the temporary is supposed to feel slightly different, and that a little sensitivity after cementation is the tooth settling in, not a sign that something went wrong.
What I find underappreciated in most crown guides is the second visit. Patients often treat it as a formality, but the final fitting is where a good crown becomes a great one. Bite alignment, margin fit, and contact with neighboring teeth all get refined at that appointment. Rushing it, or not communicating clearly about how the bite feels, is where long-term problems start. Speak up if something feels off. That feedback is genuinely useful.
At Clayton Dental Studio, we use CAD/CAM technology for same-day crowns, which means many patients skip the temporary crown phase entirely. But whether you come in for one visit or two, the goal is the same: a crown that fits well, feels natural, and lasts. Regular hygiene visits and a night guard (if you grind) will do more for your crown’s longevity than any material choice alone.
Ready to move forward? Clayton Dental Studio is here to help
Same-day crowns mean no waiting weeks for a lab, no temporary crown to manage, and no second appointment to rearrange your schedule around. At Clayton Dental Studio in Humble, TX, Dr. Navneet Kamboj uses in-office CAD/CAM technology to design, mill, and place your crown in a single visit for qualifying cases. For patients who prefer or require the traditional lab route, the process is just as comfortable, with clear communication at every step.

If you have questions about whether a crown is right for your tooth, which material fits your situation, or what to expect from your first appointment, the team at Clayton Dental Studio is glad to walk you through it. Bring your insurance information and a list of any current medications. To see the full range of restorative and dental services available, or to book your consultation, visit the clinic’s website or call the Humble, TX office directly. For patients managing dental anxiety, comfort options are available and worth discussing before your appointment.
Useful sources
The clinical information in this guide draws from the following reputable sources. For questions specific to your own case, always consult your dentist directly.
- Dental Crowns: Types, Procedure & Care — Cleveland Clinic
- Dental Crowns Guide — Delta Dental
- Dental Crowns Overview — MedlinePlus (NIH)
- Dental Crown Procedure Explained — Dr. Stan Chien DDS
- The Dental Crown Procedure Step by Step — My Specialty Dentist
- Same-Day Dental Crowns in Humble, TX — Clayton Dental Studio
This article is general patient education, not a substitute for professional dental advice. Confirm the details of your own treatment plan with your dentist or a licensed dental professional.
Recommended
Ready to Schedule Your Appointment?
Dr. Kamboj and the Clayton Dental Studio team are here to help. Call us or book online today.