
Research-based patient guide to clear aligner attachments: what they do, which tooth movements studies support, when you’ll likely need them, and what to ask.
Humble Patients: How Research Guides Clear Aligner Attachments

Attachments are small, tooth-colored composite bumps bonded to specific teeth that give clear aligners a handle to grip. Without them, plastic aligners have almost nothing to hold onto for tricky movements like rotation, intrusion, extrusion, or root torque. Most patients with moderate-to-complex misalignment will have some, and both placing and removing them is quick, painless, and completely routine.
TL;DR:
- Attachments are small, tooth-colored composite bumps that provide a grip point for complex tooth movements like rotation and torque, often on four to twelve teeth per arch.
- The shape, size, and placement of attachments are customized based on each tooth’s movement needs, with larger, sharper edges improving derotation performance.
- Proper planning and clinician adjustment of attachment placement are more critical to success than the specific shape or design of the attachments.
- Bonding attachments is a quick, painless in-office procedure with minimal risk to enamel or gums when done correctly, and removal is simple and comfortable.
- Attachments mainly improve movement accuracy but do not significantly speed treatment, and their presence is contingent on case complexity, with some mild cases finishing without them.
Table of Contents
- What Are Clear Aligner Attachments Made Of?
- How Do Attachments Move Teeth More Precisely?
- What Shapes Do Attachments Come In?
- What Happens at the Attachment Placement Appointment?
- Do Attachments Hurt or Show When You Smile?
- What Does the Clinical Research Actually Say?
- Do You Need Attachments for Your Case?
- Clayton Dental Studio’s Perspective on Attachments
- Can Attachments Damage Your Enamel or Gums?
- Are There Alternatives to Attachments?
- How Do You Keep Attachments Intact During Treatment?
- Do Attachments Change How You Brush and Floss?
- Does Insurance Cover the Cost of Attachments?
- The Real Lesson From the Research on Attachments
- Ready to Find Out if Attachments Are Right for You?
- Sources
- FAQ
What Are Clear Aligner Attachments Made Of?
Clear aligner attachments are a shaped bit of dental composite resin, the same tooth-colored material used for fillings, bonded directly onto the enamel surface. Teeth are naturally curved and slick, which is exactly the problem: a smooth aligner shell has very little to press against. An attachment gives it something to catch, which is why patients sometimes hear them described as “handles” or, less formally, as clear aligner bumps.
Most attachments measure between 1 and 3 millimeters in height, roughly the size of a grain of rice standing on end. That small footprint matters. Too subtle, and the aligner has nothing meaningful to engage. Too large, and it becomes uncomfortable or overly visible. Your dentist calculates the right dimensions for each tooth based on the movement it needs to make.
Pro Tip: If you’re curious why one tooth gets a bigger attachment than its neighbor, ask. The size usually reflects how much work that specific tooth has to do, not an arbitrary choice.
Attachments exist because clear aligners rely on mechanical grip rather than the metal brackets and wires used in traditional braces. A bracket is cemented directly to the tooth and stays connected to an archwire the entire time. An aligner, by contrast, is a removable shell that has to create its own undercut, its own “shelf” to push or pull against, using nothing but composite bumps and the shape of the tray itself.
Placement isn’t random. Clinicians follow a few practical constraints:
- Attachments generally sit at least 1.5 millimeters away from the gum line to prevent the composite from creating pressure sores or interfering with soft tissue.
- Teeth with large fillings, crowns, or damaged enamel are often skipped or treated with a modified design, since the bonding surface needs to be sound.
- Placement location is chosen relative to the tooth’s center of resistance, the point around which it naturally wants to rotate or tip, so the attachment can generate exactly the force needed and nowhere else.
That gingival distance rule isn’t just a cosmetic guideline. Attachments placed too close to the gum line can flex the aligner plastic in ways that cause deformation over time or irritate the tissue every time the tray seats. A well-planned attachment map keeps every bump far enough from soft tissue to stay comfortable across the roughly one to two weeks each aligner set is worn.
Not every case needs them. A small percentage of very mild cases can finish treatment attachment-free, but most adult patients end up with attachments on somewhere between four and twelve teeth per arch, depending on how much rotation, tipping, or vertical movement the case requires. If your treatment plan shows a mouth full of small bumps mapped onto your digital model, that’s not a sign your case is unusually difficult. It’s simply how clear aligner attachments do their job.
How Do Attachments Move Teeth More Precisely?
An aligner tray is essentially a flexible plastic wrapper. On its own, it can nudge a tooth gently in the direction the tray’s shape dictates, but it struggles to apply a twisting or lifting force with any precision. Attachments change that by giving the tray a fixed point of contact, so when the aligner flexes around the bump, it creates a specific push or pull exactly where the tooth needs it.
Think of it like trying to turn a smooth round doorknob with wet hands versus one that has a raised ridge molded into it. The ridge gives your fingers something to grip so the twisting force actually transfers into the knob instead of sliding off. An attachment does the same thing for the aligner tray: it converts a general squeeze into a targeted moment of force around the tooth’s center of resistance.
Systematic reviews of clinical trials show attachments meaningfully improve outcomes for rotation, anterior root torque, and mesio-distal bodily movement, and they’re considered important for anchoring posterior teeth while other teeth move around them. Intrusion, pushing a tooth further up into the socket, also tends to benefit from attachments, though the evidence there is a bit thinner than for rotation. Extrusion, pulling a tooth down and out, has the weakest and most mixed evidence of the group. Some cases respond well; others need additional mechanics beyond a standard attachment.
| Tooth movement | How well attachments help | What this means in practice |
|---|---|---|
| Rotation | Well supported | Attachments are near-standard for teeth that need to twist into alignment |
| Anterior root torque | Well supported | Often paired with staging changes for full effect |
| Mesio-distal bodily movement | Well supported | Helps teeth slide along the arch rather than just tip |
| Intrusion | Moderately supported | Benefits from precise placement near the biting edge |
| Extrusion | Mixed evidence | May need extra mechanics beyond a single attachment |
Pro Tip: If your treatment plan includes a tooth that needs to extrude, don’t be surprised if your dentist schedules an earlier check-in. This is one of the movements most likely to need a mid-course refinement.
Even with well-placed attachments, teeth don’t always move exactly on schedule. Root torque in particular sometimes needs backup. Clinicians occasionally pair an attachment with a power ridge or adjust the staging of aligner steps because attachments alone can be insufficient for complete root movement without a refinement round. That’s not a failure of the technology. It’s a reflection of how much force a small composite bump can realistically generate before biology needs a second nudge.
This is also why “optimized” or computer-designed attachments, ones engineered with multiple angled faces, don’t always outperform standard rectangular designs in real mouths, even though they often look more sophisticated in a lab model. A resource like the clear aligner biomechanics guide from OneWD walks through how staging increments as small as a quarter of a millimeter interact with attachment placement, which underscores just how much of the outcome depends on planning rather than the attachment shape alone.
What Shapes Do Attachments Come In?
Not all clear braces attachments look the same, and the shape isn’t cosmetic. Each design is chosen to match the specific force a tooth needs.
- Rectangular attachments are the workhorse shape, offering flat surfaces on multiple sides that give the aligner a broad, stable grip for general retention and mild rotation.
- Ellipsoidal (oval) attachments have a rounder profile, often used where a subtler, less angular bump is preferable, sometimes on smaller teeth like lower incisors.
- Beveled attachments have one or more angled faces designed to push a tooth in a specific rotational direction rather than simply holding it in place.
- Optimized attachments are computer-designed shapes that combine several angled surfaces to apply multi-axis force in a single bump, useful for teeth that need more than one type of movement at once.
Size and edge sharpness matter just as much as the base shape. Larger attachments with sharper edges tend to perform better during derotation, the movement of twisting a tooth back into proper alignment, because the crisp edge gives the aligner plastic a firmer surface to catch. That said, piling on more attachments doesn’t guarantee a better result. The relationship between attachment count and outcome isn’t linear, so a treatment plan with fewer, well-placed attachments can outperform one with more bumps scattered across the arch.
Most attachments go on the buccal surface, the outward-facing side of the tooth that’s visible when you smile or talk. It’s the easier surface to bond, to check, and to keep clean. But palatal or tongue-side placement is sometimes used depending on tooth anatomy and treatment goals, particularly on front teeth where visibility is a bigger concern. A palatal attachment can still generate the mechanical force needed while staying essentially invisible from the front, though it does require your dentist to check fit and bonding from the back of the tooth, which takes a bit more chair time.
What Happens at the Attachment Placement Appointment?
Bonding attachments is a same-day, in-office procedure that doesn’t involve any drilling into the tooth itself. Here’s what the appointment generally looks like:
- Cleaning and drying. The tooth surface is cleaned of plaque and thoroughly dried so the bonding material can adhere properly.
- Etching. A mild etching gel is applied for roughly 15 to 20 seconds to create a microscopically rough surface that composite resin can grip.
- Bonding agent application. A thin layer of adhesive is painted onto the etched enamel, creating the bridge between tooth and composite.
- Template tray seating. A custom template tray, essentially a stripped-down version of your aligner with pockets cut for each attachment, is loaded with composite resin and seated over your teeth.
- Light curing. A dental curing light hardens the composite in each pocket within seconds, locking the attachment into its exact planned shape and position.
- Trimming and polishing. Any excess composite is smoothed and polished so the attachment has clean edges and doesn’t feel rough against your cheek or tongue.
The whole visit typically runs 30 to 45 minutes depending on how many teeth are involved. It’s comfortable enough that most patients describe it as similar to getting a filling, minus any numbing shots, since there’s no drilling into live tooth structure.
Removal at the end of treatment is even simpler. Your dentist uses a polishing burr to gently buff away the composite, restoring a smooth enamel surface underneath. There’s no anesthesia needed and no discomfort beyond the vibration of the burr, which most patients say feels like nothing more than a routine cleaning.
Do Attachments Hurt or Show When You Smile?
Attachments are far less noticeable than most people expect. At normal conversation distance, a tooth-colored bump blends into the natural texture of your smile. Up close, in bright light, or on high-resolution video and selfies, they’re more visible, especially on front teeth. If that’s a concern, ask your dentist about palatal placement options for the teeth that show most.
Comfort follows a predictable pattern. Most people notice a mild adjustment period of about 72 hours after each new aligner set goes on, some tightness or awareness of the attachments against the tongue or cheek. Biting on orthodontic chewies for a few minutes after inserting a new tray helps seat the aligner fully over each attachment, which reduces both the initial discomfort and the odds of an attachment not engaging properly.
Daily care isn’t complicated, but it does add a couple of habits:
- Brush after every meal before reinserting your aligners, since food particles trapped against an attachment are harder to dislodge than on a smooth tooth.
- Floss normally. Attachments don’t interfere with interdental cleaning.
- Skip extremely hard or sticky foods when your aligners are out, since heavy biting forces are one of the more common causes of a detached attachment.
If an attachment does pop off, don’t panic and don’t stop wearing your aligners. Continuing to wear your current tray is usually fine if it still seats properly, and your dental office can rebond a replacement at your next visit. A missing attachment for a few days rarely derails a treatment plan.
What Does the Clinical Research Actually Say?
The most rigorous evidence on clear aligner attachments comes from systematic reviews that pool results across multiple clinical trials, and the picture they paint is encouraging but not unconditional.
Reviews of the clinical literature consistently find that attachments improve the effectiveness of aligner therapy for rotation and anterior root torque, two of the movements that clear aligners historically struggled with before attachments became standard practice. Mesio-distal bodily movement, sliding a tooth along the arch rather than tipping it, also shows a consistent benefit. Posterior anchorage, using back teeth as a stable base while front teeth move, depends heavily on attachments doing their job quietly in the background.
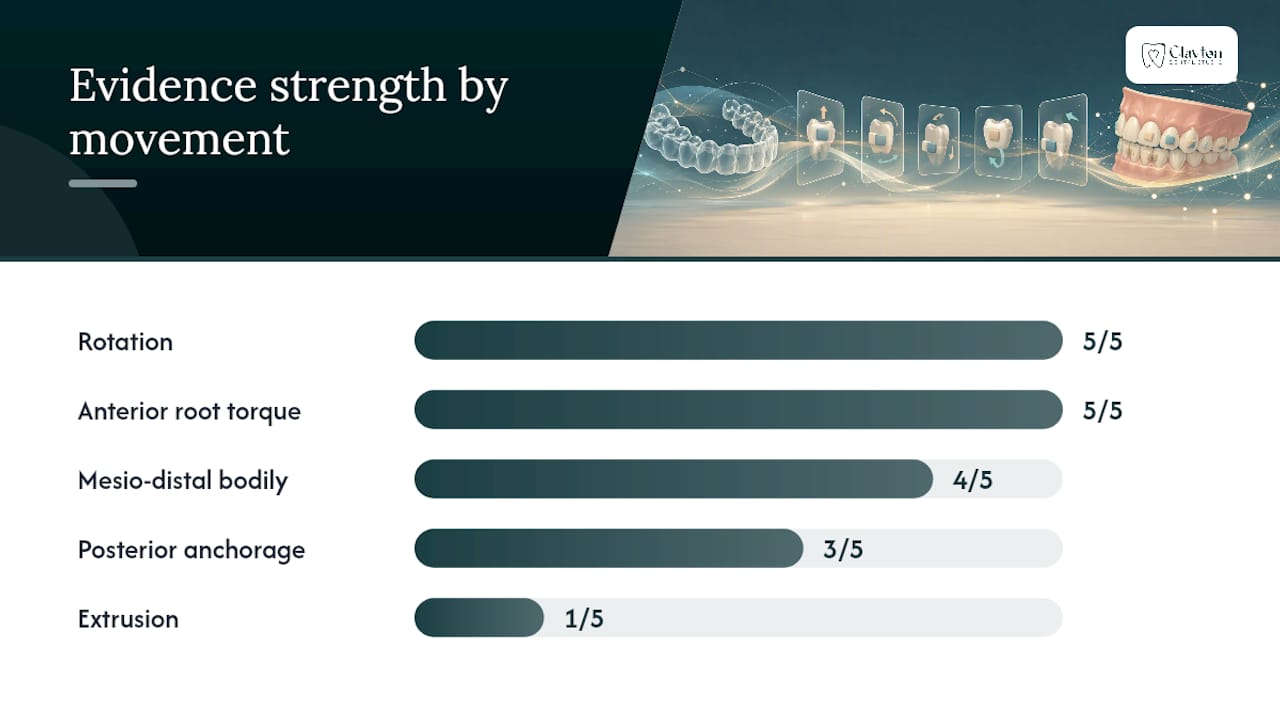
Where the evidence gets less certain is extrusion and some intrusion outcomes. A handful of trials show real improvement; others show attachments making little measurable difference for those specific movements. That inconsistency isn’t necessarily a flaw in the technology. It often reflects how variable extrusion mechanics are from one tooth, one bite, and one attachment design to the next.
A closer look at trial quality adds an important caveat: many of the clinical trials behind these findings carry a medium risk of bias and rely on relatively small sample sizes. That doesn’t mean the conclusions are wrong. It means the right posture for both patients and clinicians is cautious optimism rather than blind faith in any single attachment design.
- Rotation and anterior root torque have the strongest research support among all attachment-assisted movements.
- Extrusion has the least consistent evidence, and some cases will need mechanics beyond a standard attachment.
- Optimized, computer-designed attachments show theoretical biomechanical advantages in lab models, but clinical trials often fail to detect statistically significant superiority over standard rectangular or ellipsoidal shapes in real patients.
- Sample sizes in many trials are small enough that individual results should be read as suggestive, not definitive.
What this evidence base means practically is that attachment design matters less than most patients assume, and clinician planning matters more. A skilled dentist reading your digital scan, choosing attachment placement relative to each tooth’s center of resistance, and staging movements in the right sequence has more influence on your outcome than whether your attachments are rectangular or a fancier optimized shape. This is also why refinement rounds, additional aligner sets ordered partway through treatment, remain a normal and expected part of the process rather than a sign something went wrong. Teeth are biological structures responding to mechanical force, not machine parts following a blueprint exactly.
Do You Need Attachments for Your Case?
Not every patient needs a mouth full of bumps. Certain case features make attachments far more likely to appear in your treatment plan:
- Rotations beyond a mild degree, particularly on rounder teeth like canines and premolars that resist twisting without a mechanical grip.
- Any planned intrusion or extrusion, since vertical movement is one of the hardest things for a plain aligner shell to accomplish alone.
- Weak baseline retention, where a tooth’s natural shape doesn’t give the aligner much to hold onto even for simple positioning.
- Complex bite corrections involving multiple teeth moving in coordinated but different directions at once.
Before your first attachments go on, it’s worth asking your dentist a few direct questions:
- How many attachments will I have, and on which teeth?
- Will any be visible when I smile or talk, and are there placement options to reduce that?
- What happens if one comes off between appointments?
- How likely is it that my plan will need refinement aligners partway through, and does that come with an added cost?
Your attachment map isn’t necessarily fixed from day one. As teeth respond to treatment, some attachments may be added, removed, or reshaped during a refinement scan, especially for movements like torque that sometimes need a second push to finish correctly.
Clayton Dental Studio’s Perspective on Attachments
At Clayton Dental Studio, we don’t guess where attachments go. Dr. Navneet Kamboj, DDS, who completed a specialized restorative preceptorship at UCLA, reviews each patient’s digital scan and adjusts the lab’s suggested attachment map based on the specific movements that case actually needs, not a generic template.
That review step matters more than most patients realize. A software-generated plan is a starting point, not a finished prescription, and small adjustments to attachment placement or staging can reduce how many refinement rounds a case ultimately needs. If you’re weighing whether clear aligner treatment makes sense for you, this kind of hands-on planning is exactly what separates a smooth outcome from a frustrating one.
We also want patients to feel at ease about the mechanics themselves. Bonding takes under an hour, removal is painless, and our team walks every patient through hygiene habits that keep attachments clean and intact for the full length of treatment.
Can Attachments Damage Your Enamel or Gums?
Bonded attachments are considered a safe, reversible procedure when placed and removed correctly. The composite resin bonds only to the outer enamel layer, and removal with a polishing burr doesn’t cut into live tooth structure. That said, a couple of real risks deserve attention.
Enamel can develop faint surface roughness or, rarely, minor discoloration around a bonding site if oral hygiene lapses during treatment, since plaque tends to collect more easily around a raised bump than a flat tooth surface. This is almost always cosmetic and preventable with consistent brushing, not a sign of underlying damage.
Gum irritation shows up more often than enamel problems, usually when an attachment sits too close to the gingival margin or when the aligner tray doesn’t seat cleanly over a bump. Mild redness or tenderness near an attachment site typically resolves once the aligner is fitting properly, but persistent irritation is worth a call to your dental office rather than waiting it out.
The 1.5 millimeter gingival clearance rule mentioned earlier exists specifically to minimize this risk category. Attachments placed with that buffer rarely cause ongoing tissue problems, which is one more reason precise planning before bonding matters more than the number of attachments a case gets.
Are There Alternatives to Attachments?
Some patients ask whether they can skip attachments altogether, and occasionally the answer is yes. Very mild cases involving only slight crowding or minor spacing, without significant rotation, intrusion, or extrusion, can sometimes finish treatment with plain aligner trays and no bonded attachments at all.
For cases that need some mechanical assistance but not a full attachment, precision cuts in the aligner material itself can create limited grip for very small movements. This approach works best for minor corrections and tends to fall short once rotation exceeds a few degrees or vertical movement is involved.
Traditional braces remain the alternative when a case is complex enough that attachments plus aligners still wouldn’t provide sufficient control, particularly for significant bite corrections or multiple teeth needing large, coordinated movements. Braces apply continuous force through wires and brackets rather than the intermittent force of a removable tray, which gives clinicians more direct control in especially difficult cases.
For most patients in the moderate range, though, skipping attachments isn’t really an upgrade. It’s a trade-off that usually means slower, less predictable progress on the exact movements attachments are best at solving.
How Do You Keep Attachments Intact During Treatment?
Attachments are durable, but a few habits go a long way toward keeping them bonded for the full length of treatment.
Always remove aligners by pulling gently from the back molars rather than yanking from the front, since front-loaded force is one of the most common ways an attachment gets pried loose. Reinsert trays carefully, seating them fully with your fingers rather than biting them into place, which reduces uneven pressure on any single bump.
Diet matters more than most patients expect. Sticky candy, ice chewing, and very hard foods like nuts eaten without aligners in place still put stress on attachments during the brief windows your teeth are exposed, and habits like nail biting or chewing on pens can dislodge a bump you’d otherwise never think about.
Using orthodontic chewies for a few minutes after inserting each new aligner set helps seat the tray fully over every attachment from the start, which both improves initial tooth movement and reduces the odds of a bump popping loose from an incompletely seated tray. If you notice a bump feels sharp, loose, or different from how it felt the day before, that’s worth a quick call rather than waiting for your next scheduled visit.
Do Attachments Change How You Brush and Floss?
Attachments don’t change your flossing routine at all, but they do add a small wrinkle to brushing. A raised composite bump gives plaque a slightly easier surface to cling to than smooth enamel, particularly right where the attachment meets the tooth.
Brushing after every meal, not just morning and night, becomes more important once attachments are in place, since food debris trapped against a bump before you reinsert your aligner tray sits there for hours otherwise. A soft-bristled brush angled to reach both above and below each attachment does the job well; an electric brush with a small head can make that easier for patients with several attachments clustered on adjacent teeth.
Some patients also find a water flosser helpful for clearing debris from around attachment edges, though it’s a supplement to normal flossing rather than a replacement. The bigger hygiene shift is really about frequency and attention rather than any special product. Attachments simply reward a bit more consistency than a completely smooth tooth would need.
Does Insurance Cover the Cost of Attachments?
Attachments themselves are rarely billed as a separate line item. They’re typically bundled into the overall cost of clear aligner treatment rather than priced individually, since they’re a standard component of the treatment plan rather than an optional add-on.
Dental insurance coverage for orthodontic treatment, including aligner therapy, varies significantly by plan. Some plans cover a percentage of orthodontic treatment up to a lifetime maximum, often with different rules for adults versus dependent children. Others exclude adult orthodontics entirely. It’s worth calling your insurance provider directly to ask specifically about clear aligner coverage rather than assuming braces coverage automatically extends to aligners.
Pricing for clear aligner treatment varies depending on case complexity, attachments, and refinement rounds; current prices are available on the provider’s pricing page. Current pricing and financing options are available directly through the clear aligner services page, and our team can walk through what your insurance is likely to cover during a consultation.
The Real Lesson From the Research on Attachments
The conventional pitch around clear aligner attachments treats them like a simple upgrade: add attachments, get better results, done. The research tells a more useful story. Attachments genuinely improve outcomes for rotation and root torque, two of the movements plain aligner trays handle worst, but the review evidence also shows real limits, particularly for extrusion, and flags that many supporting trials are small and carry meaningful bias risk.
What gets underestimated is how much clinician planning outweighs attachment shape. Patients often fixate on whether they’re getting “optimized” attachments, when the research actually shows those computer-designed shapes rarely beat standard designs by a significant margin. The variable that actually predicts a smooth outcome is whether your dentist reviewed and adjusted the attachment map for your specific case rather than accepting a software default.
If you take one thing from this, prioritize the conversation over the geometry. Ask how your plan was reviewed, not just how many bumps you’ll have.
— Clayton Dental Studio
Ready to Find Out if Attachments Are Right for You?
Wondering whether your case needs a handful of attachments or none at all comes down to one thing: getting a real digital scan read by someone who adjusts the plan instead of rubber-stamping it. That is a distinguishing approach in clear aligner treatment. Dr. Kamboj personally reviews every attachment map before it’s approved, catching cases where a software default would have meant extra refinement rounds down the road.
Our process starts with a full digital scan, moves into a treatment plan tailored to exactly which teeth need rotation, torque, or intrusion help, and includes attachment placement, routine check-ins, and refinements if your case calls for them. If a comprehensive cleaning or restorative work would help your smile before aligners begin, our general dentistry team can handle that in the same office, on the same treatment timeline.
If you’re ready to see whether clear aligners fit your case, visit our clear aligners page to learn what a consultation includes, or call our Humble office to schedule your first scan.
This article is general information, not a substitute for advice from a qualified doctor. Consult a qualified healthcare professional about your own circumstances before acting on anything here.
Sources
- Clear Aligner Attachments: A Comprehensive Review - PMC
- Invisalign attachments: benefits, procedure, care, and more - Healthline
FAQ
Do Clear Aligners Always Have Attachments?
Not always. A small percentage of very mild cases can finish treatment without any attachments, but most adult patients end up with attachments on four to twelve teeth per arch depending on how much rotation or vertical movement their case requires.
What Is the 30 Minute Rule With Clear Aligners?
The “30 minute rule” refers to the typical chairside appointment length for bonding attachments, which generally takes 30 to 45 minutes depending on how many teeth are involved. It’s a single, same-day visit with no anesthesia required.
What Do Different Attachment Shapes Actually Do?
Rectangular attachments provide broad, stable retention, ellipsoidal shapes offer a subtler grip on smaller teeth, and beveled or optimized designs apply directional or multi-axis force for rotation and combined movements. Reviews show larger attachments with sharper edges tend to perform better during derotation.
Do Attachments Make Aligner Treatment Faster?
Attachments improve the precision and predictability of specific movements like rotation and root torque rather than simply speeding up treatment overall. Systematic-review evidence supports better outcomes for these movements, but complex cases may still need refinement rounds regardless of how many attachments are used.
What Should I Do if an Attachment Falls Off?
Keep wearing your current aligner if it still fits properly and contact your dental office to schedule a rebonding visit. Continuing scheduled wear is usually better than pausing treatment, and a missing attachment for a few days rarely derails your overall plan.
Recommended
Ready to Schedule Your Appointment?
Dr. Kamboj and the Clayton Dental Studio team are here to help. Call us or book online today.